将执行任务的代码放在一个类的run方法中,类要实现Runnable接口。Runnable内部十分简单,只有一个run方法
1
2
3
4
@FunctionalInterface public interface Runnable { public abstract void run () ; }
Runnable是一个函数式接口,所以可以用lambda表达式创建实例
从Runnable构造一个Thread对象
1 Thread t = new Thread (r);
启动线程
组合在一起代码如下:
1
2
3
4
5
6
7
8
9
10
new Thread (() -> { for (int i = 0 ; i < 100 ; i++) { System.out.println("Hello, World! Two!" ); } }).start(); new Thread (()->{ for (int i = 0 ; i < 100 ; i++) { System.out.println("Hello, World! One!" ); } }).start();
打印内容部分如下:
1
2
3
4
5
6
7
8
9
10
11
……… Hello, World! Two! Hello, World! Two! Hello, World! Two! Hello, World! Two! Hello, World! Two! Hello, World! One! Hello, World! One! Hello, World! One! Hello, World! One! ………
可以看到输出是交错的
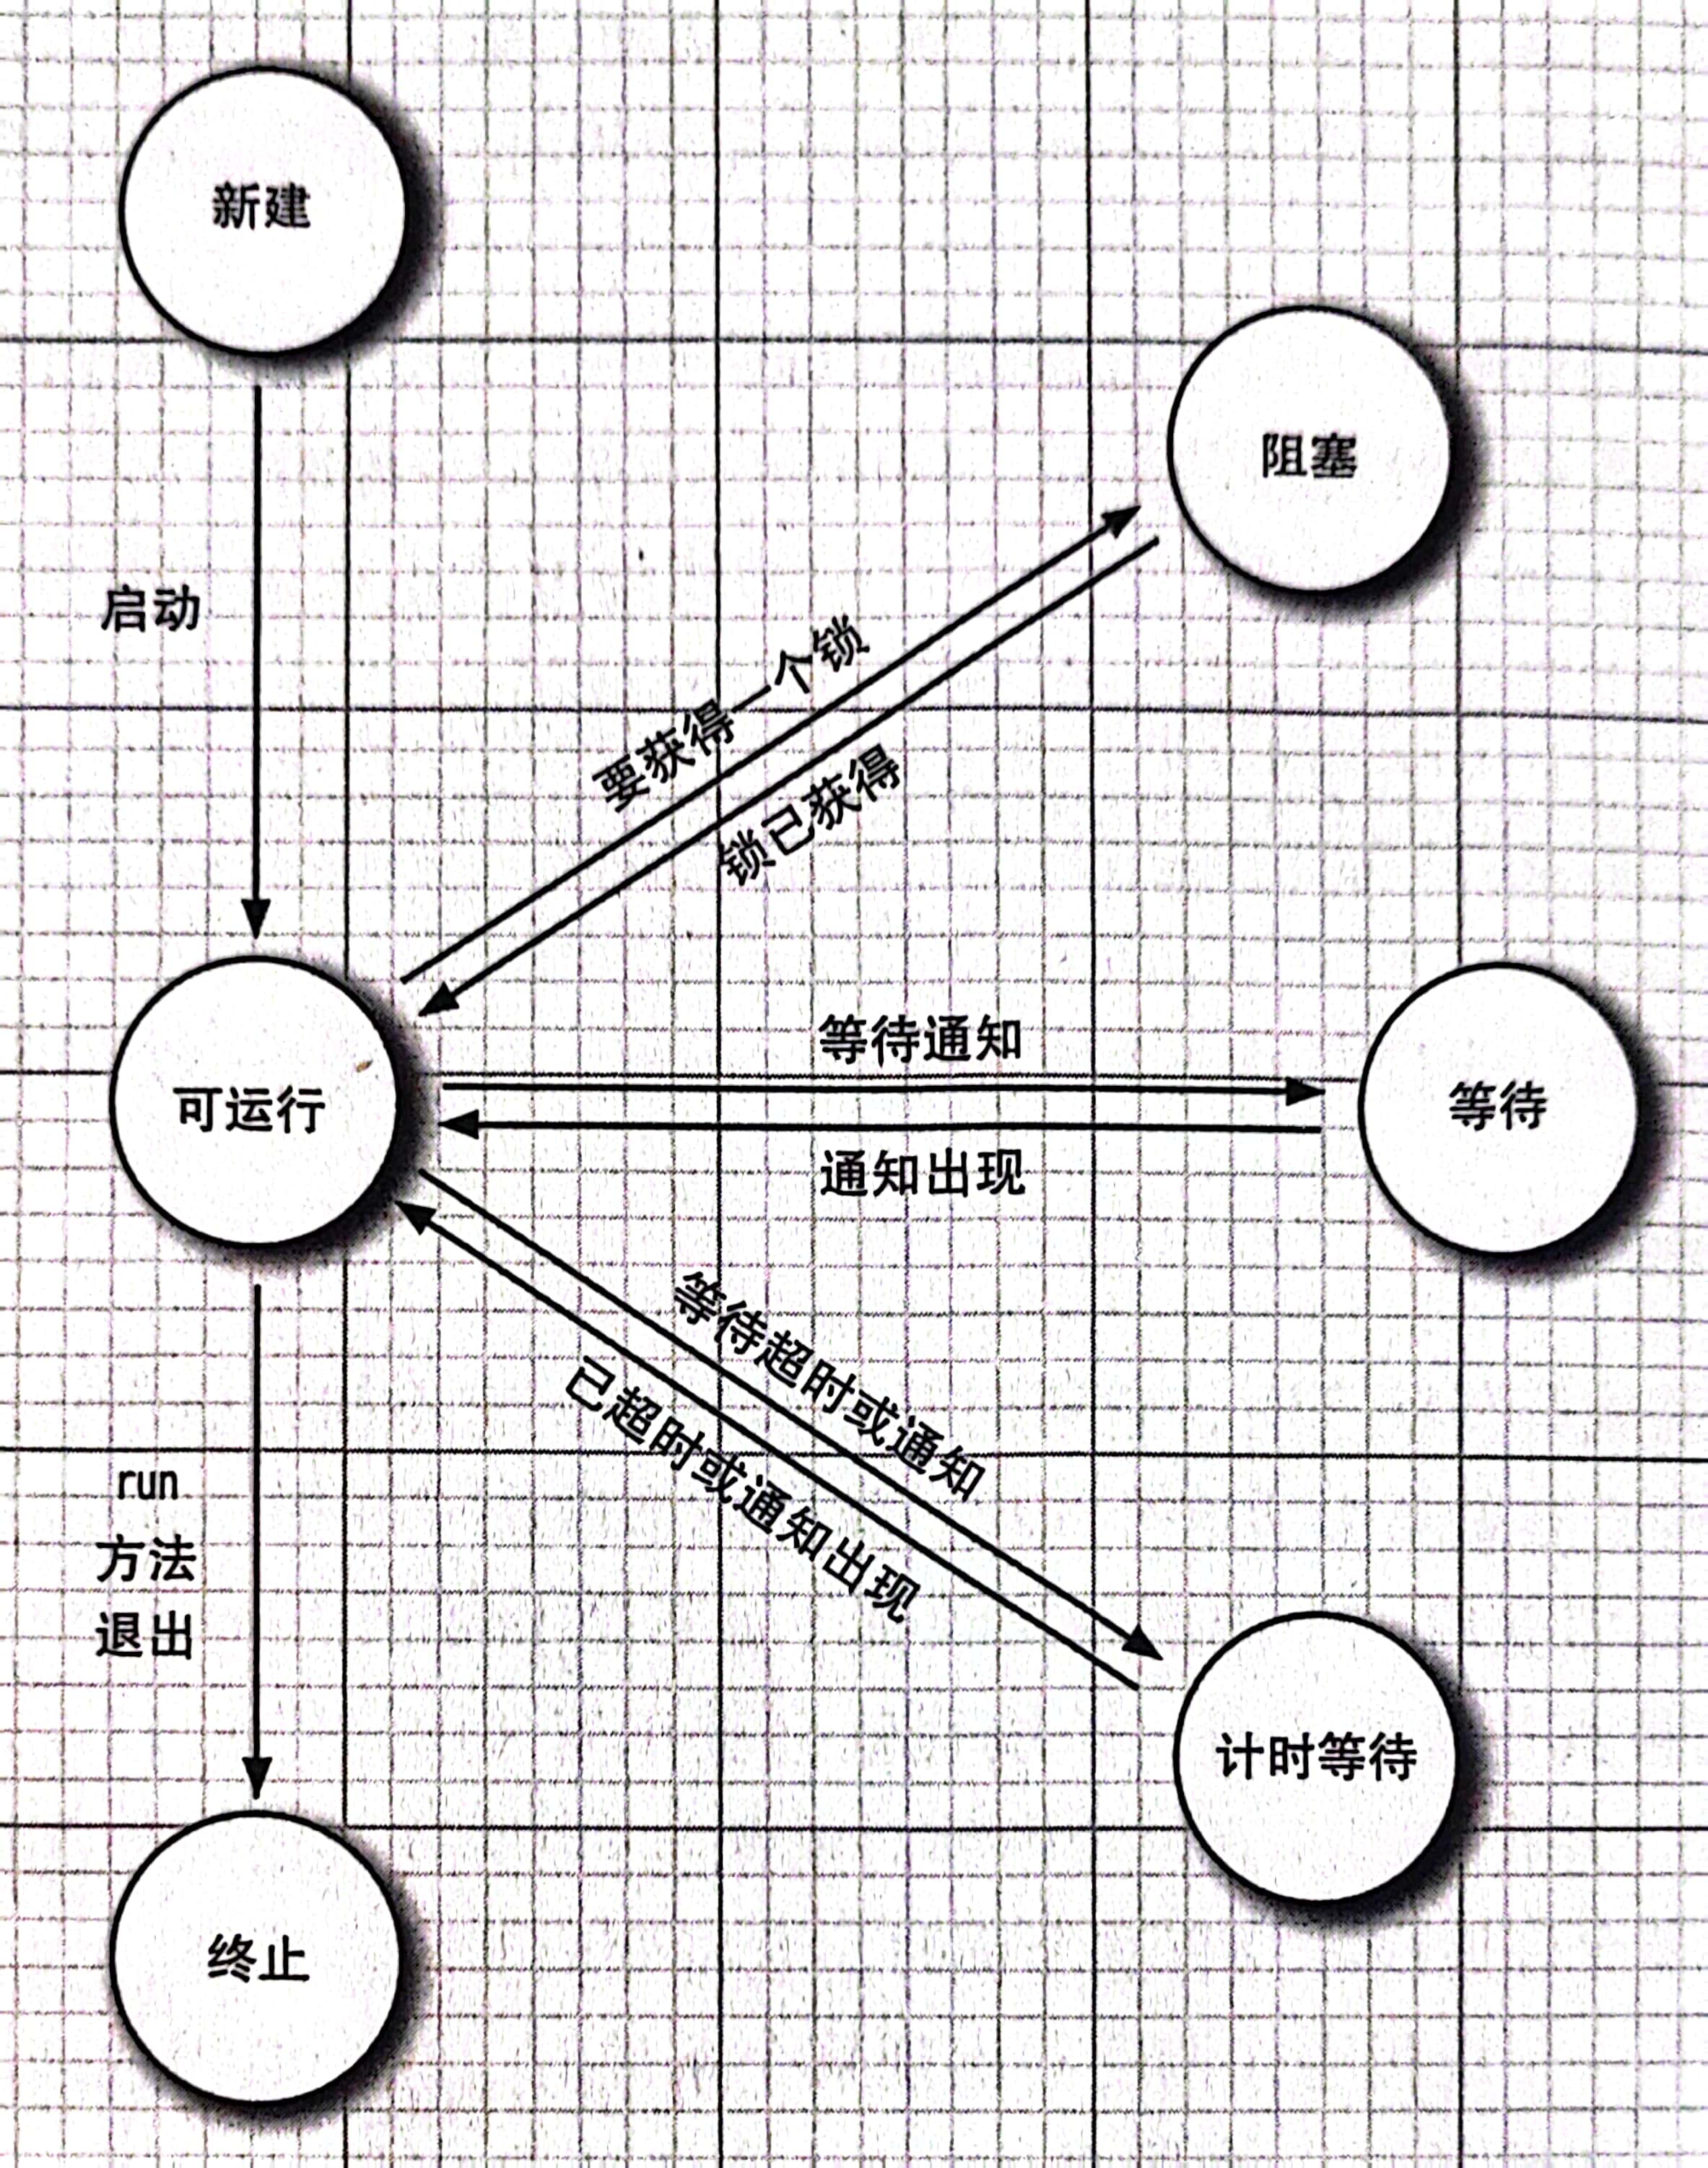
线程有如下六种状态:
New(新建)
Runnable(可运行)
Blocked(阻塞)
Waiting(等待)
Timed waiting(计时等待)
Terminated(终止)
可以用getState方法确定线程状态
当线程内程序执行完成或者出现未捕获的异常时,这个线程将终止。
除了已经废弃的stop方法没有办法使一个线程终止。
不过现在有interrut方法可以请求终止一个线程
当使用这个方法后,线程就会被设置为中断状态interrupted status。每个线程都有这样一个boolean标准。各个线程都应该不时地检查这个标志
要确定是否终端可以先获取当前线程Thread.currentThread然后调用isInterrupted方法
1
2
3
4
5
6
7
8
9
10
11
12
13
14
15
16
17
18
19
20
21
22
23
24
25
public static void main (String[] args) { Runnable r = () -> { int i = 233 ; for ( int j = 0 ; j < i; j++ ) { System.out.println("当前是第" + j + "次循环" ); if (j == 10 ){ Thread.currentThread().interrupt(); } if (Thread.currentThread().isInterrupted()){ System.out.println("线程被中断" ); break ; } } }; Thread t = new Thread (r); t.start(); }
运行后打印内容如下
1
2
3
4
5
6
7
8
9
10
11
12
当前是第0次循环 当前是第1次循环 当前是第2次循环 当前是第3次循环 当前是第4次循环 当前是第5次循环 当前是第6次循环 当前是第7次循环 当前是第8次循环 当前是第9次循环 当前是第10次循环 线程被中断
如果每次执行后调用sleep()方法或者其他中断方法,既没有必要也没有用处。此时调用sleep方法不会休眠,同时会清除中断状态并抛出InterruptedException
所以如果使用sleep方法应当捕获InterruptedException而非检查中断状态
1
2
3
4
5
6
7
8
9
10
11
12
13
14
15
16
17
18
19
20
21
22
23
24
25
26
27
28
29
30
public static void sleep方法和中断状态(){ Runnable r = () -> { int i = 233 ; try { for ( int j = 0 ; j < i; j++ ) { System.out.println("当前是第" + j + "次循环" ); Thread.sleep(300 ); if (j == 10 ){ Thread.currentThread().interrupt(); } } } catch (InterruptedException e) { System.out.println(Thread.currentThread().isInterrupted()); System.out.println("线程被中断" ); throw new RuntimeException (e); } }; Thread t = new Thread (r); t.start(); }
或者也可以为整个方法抛出异常,这样调用者就知道发生了什么
1
2
3
4
5
6
7
8
9
10
public static void sleep方法和中断状态() throws InterruptedException { int i = 233 ; for ( int j = 0 ; j < i; j++ ) { System.out.println("当前是第" + j + "次循环" ); if ( j == 10 ) { Thread.currentThread().interrupt(); } Thread.sleep(300 ); } }
调用它的main方法如下:
1
2
3
4
5
6
7
8
9
10
11
public static void main (String[] args) throws InterruptedException { Runnable r = () ->{ try { sleep方法和中断状态(); } catch (InterruptedException e) { throw new RuntimeException (e); } }; Thread t = new Thread (r); t.start(); }
sleep方法会控制当前的线程休眠,而不能控制其他线程休眠,休眠结束后线程进入就绪状态。
yield方法是一个和sleep方法有点相似的方法,它也是Thread类提供的一个静态方法。可以让当前正在执行的线程暂停,但它不会阻塞该线程,只是将该线程转入就绪状态。
区别总结如下:
优先级区分:sleep方法暂停当前线程后,会给其他线程执行机会,不区分其他线程的优先级;但yield()方法只会给优先级相同,或优先级更高的线程执行机会。
抛出异常区分:sleep方法声明抛出了InterruptedException异常,所以调用sleep方法时要么捕捉该异常,要么显式声明抛出该异常;而yield()方法则没有声明抛出任何异常。
运行状态区分:sleep方法会将线程转入阻塞状态,直到经过阻塞时间才会转入就绪状态;而yield()不会将线程转入阻塞状态,它只是强制当前线程进入就绪状态。因此完全有可能某个线程被yield()方法暂停之后,立即再次获得处理器资源被执行。
可以调用t.setDaemon(true)。它唯一的作用是给其他线程提供服务,如计时服务等。
清空果实缓存项的线程也是守护线程,只剩下守护线程,虚拟机就会退出。
可以用t.setName("Wwhds t")为线程设置名字
线程的run方法不能抛出任何检查型异常,但是非检查型异常可能导致线程终止,这种情况下线程会死亡
在线程死亡前,会传递到一个用于处理未捕获异常的处理器
这个处理器必须属于一个实现了Thread.UncaughtExceptionHandler的类
1
2
3
4
5
6
7
class 处理器 implements Thread .UncaughtExceptionHandler { @Override public void uncaughtException (Thread t, Throwable e) { System.out.println("线程" + t.getName() + "抛出了异常" ); e.printStackTrace(); } }
可以用setUncaughtExceptionHandler方法为线程安装处理器
1
2
3
4
5
6
7
8
public static void main (String[] args) { Runnable r = () -> { throw new RuntimeException ("抛出了一个异常" ); }; Thread t = new Thread (r); t.setUncaughtExceptionHandler(new 处理器()); t.start(); }
打印内容如下
1
2
3
4
线程Thread-0抛出了异常 java.lang.RuntimeException: 抛出了一个异常 at Chapter_12.未捕获异常的处理器.lambda$main$0(未捕获异常的处理器.java:12) at java.base/java.lang.Thread.run(Thread.java:840)
也可以用setDefaultUncaughtExceptionHandler为所有线程安装一个默认的处理器
1
2
3
4
public static void main (String[] args) { Thread.setDefaultUncaughtExceptionHandler(new 处理器()); int i = 1 /0 ; }
运行后打印内容如下
1
2
3
线程main抛出了异常 java.lang.ArithmeticException: / by zero at Chapter_12.未捕获异常的处理器.main(未捕获异常的处理器.java:12)
在Java中每个线程有一个优先级,最低为1,最高为10,默认为5
当线程调度器选择线程时会优先选择优先级高的线程。
虽然Java提供了设置线程优先级的机制,但是现在一般不推荐依赖线程优先级来控制并发行为,因为它的行为在不同的系统和JVM实现中可能会有很大的差异。
在多线程应用中,多个线程可能访问同一个对象,并且分别调用了修改对象的方法。
此时,两个线程会相互覆盖。取决于线程访问数据的次序,可能导致对象被破坏。
这被称为竞态条件(race condition)
1
2
3
4
5
6
7
8
9
10
11
12
13
14
15
16
17
18
19
20
21
22
23
24
25
26
27
28
public class 竞态条件的一个例子 { private static int sharedVariable = 0 ; public static void main (String[] args) { Thread thread1 = new Thread (() -> { for ( int i = 0 ; i < 1000 ; i++ ) { sharedVariable++; } }); Thread thread2 = new Thread (() -> { for ( int i = 0 ; i < 1000 ; i++ ) { sharedVariable--; } }); thread1.start(); thread2.start(); try { thread1.join(); thread2.join(); } catch (InterruptedException e) { e.printStackTrace(); } System.out.println("Final value of shared variable: " + sharedVariable); } }
运行几次后打印内容如下:
1 Final value of shared variable: -200
按理来说这个变量自增了一千次,并且自减了一千次应该最后结果为0,但是结果并非如预期那样。
当两个线程执行对变量的操作,这个操作并非是原子操作。可能有如下处理
将变量加载到寄存器
增加\减少变量
结果写回变量
假设此时的变量值为1。
线程1执行了前两步,此时线程1寄存器中的变量为2
此时线程2被唤醒并更新变量的值
取出未被线程1更新的变量值,也就是1
对变量值进行减少,从1变为0
将0存储回原变量
此时然后线程1被唤醒完成第三步,将线程1寄存器中的2存储回原变量
此时原本应该为0的数就变成了2
我们可以用ReentrantLock确保任何时刻只有一个线程进入临界区。
一旦一个线程锁定了锁对象,其他线程都无法通过lock语句。
其他线程调用lock时,它们会暂停直到一个线程释放这个锁对象
主函数内容如下:
1
2
3
4
5
6
7
8
9
10
11
12
13
14
15
16
17
18
19
20
21
22
23
24
public static void main (String[] args) { Thread thread1 = new Thread (() -> { for ( int i = 0 ; i < 1000000 ; i++ ) { plus(); } }); Thread thread2 = new Thread (() -> { for ( int i = 0 ; i < 1000000 ; i++ ) { plus(); } }); thread1.start(); thread2.start(); try { thread1.join(); thread2.join(); } catch (InterruptedException e) { e.printStackTrace(); } System.out.println("Final value of shared variable: " + sharedVariable); }
其中的plus方法内容是为sharedVariable变量+1
此时的plus方法没有加锁:
1
2
3
private static void plus () { sharedVariable++; }
最终结果如下:
1 Final value of shared variable: 1661649
可以看到结果并非是预料的2000000
当我们添加锁之后:
1
2
3
4
5
6
7
8
private static void plus () { reentrantLock.lock(); try { sharedVariable++; } finally { reentrantLock.unlock(); } }
运行程序结果如下:
1 Final value of shared variable: 2000000
这个锁被称为重入锁(reentrant),线程可以反复获取已拥有的锁。锁有一个持有计数器跟踪对lock方法的嵌套调用
可重入性的主要应用场景是为了避免死锁。考虑一个情况,一个线程在持有一个锁的同时,又试图去获取同一个锁,如果锁是不可重入的,那么这个线程将会因为等待自己持有的锁而被永久阻塞,从而产生死锁。但是如果锁是可重入的,那么这个线程可以再次获取它已经持有的锁,从而避免死锁。
例如:
1
2
3
4
5
6
7
8
9
10
11
12
13
14
15
16
17
18
public class 锁嵌套 { private static ReentrantLock lock = new ReentrantLock (); public static void main (String[] args) { lock.lock(); try { System.out.println("外层锁 HoldCount: " + lock.getHoldCount()); lock.lock(); try { System.out.println("内层锁 HoldCount: " + lock.getHoldCount()); } finally { lock.unlock(); } } finally { lock.unlock(); } } }
运行后打印内容如下:
1
2
外层锁 HoldCount: 1 内层锁 HoldCount: 2
当其持有计数为0时,线程释放锁
通常,线程进入临界区后却发现只有满足了某个条件它才能执行。
可以用条件对象来管理那些已经获得了一个锁却不能有效工作的线程。
1 2 3 4 5 private static ReentrantLock lock = new ReentrantLock ();private static Condition lessThan233 = lock.newCondition();
假设我们此时有一个余额为0的账户,和两个方法,存钱以及消费
1 2 3 4 5 private static double money = 0 ;private static int count = 0 ;
假设每次我们买的东西都是233元,那么我们必须拥有至少233元的存款才可以消费
对于消费方法,当余额小于233元的时候我们调用条件对象的await方法使其阻塞。
1 2 3 4 5 6 7 8 9 10 11 12 13 14 15 16 17 18 19 20 21 public static void spend () { System.out.println("开始消费" ); lock.lock(); try { while ( money < 233 ) { lessThan233.await(); } money -= 233 ; count++; } catch (InterruptedException e) { e.printStackTrace(); } finally { lock.unlock(); } }
对于存款方法,我们首先要确保存款是一次完整的操作,所以需要加上锁
然后是每次进行存款后,调用条件对象的signalAll方法
signalAll方法并不会立即激活一个等待的线程,而是解除等待线程的阻塞状态,使这些线程可以在当前线程释放锁之后竞争访问对象
还有一个signal方法,它会随机选择等待集中的一个线程,并解除线程阻塞状态。
但这也有危险,当它发现自己不能运行时,它就会再次被阻塞。
如果没有其它线程调用signal方法,就会导致死锁。
1 2 3 4 5 6 7 8 9 10 11 12 13 14 15 16 17 public static void addMoney (double money) { lock.lock(); try { 条件对象.money += money; System.out.println("存入: " + money + " 余额: " + 条件对象.money); if ( 条件对象.money >= 233 ) { lessThan233.signalAll(); } } finally { lock.unlock(); } }
最后在主方法中调用这两个方法:
1
2
3
4
5
6
7
8
9
10
11
12
13
14
15
16
17
18
19
20
21
22
23
24
25
26
27
28
public static void main (String[] args) { Random r = new Random (); Thread t1 = new Thread (() -> { for ( int i = 0 ; i < 10000 ; i++ ) { addMoney(r.nextDouble(5 )); } }); Thread t2 = new Thread (() -> { for ( int i = 0 ; i < 100 ; i++ ) { spend(); } }); t1.start(); t2.start(); try { t1.join(); t2.join(); } catch (InterruptedException e) { e.printStackTrace(); } System.out.println("余额: " + money); System.out.println("消费次数: " + count); }
最后虽然能运行成功,是因为每次消费后都有足够的存钱机会使得其最终能够花出去100次。
如果消费次数更多或者存款次数更少的话,就有可能导致程序卡住
这是因为在所有的钱都被消费完之后,消费线程可能会永久地等待更多的钱被添加。这是因为在spend方法中,当money小于233时,线程会调用lessThan233.await()方法进入等待状态,直到其他线程调用lessThan233.signalAll()方法。如果没有更多的钱被添加,那么消费线程就会永久地等待。
这也就是活锁
首先对锁和条件的要点做一个总结
锁用来保护代码段,一次只允许一个线程执行被保护的代码
锁可以管理试图进入被保护代码段的线程
一个锁可以有一个或多个关联的条件对象
每个条件对象管理那些已经被保护代码段但还不能运行的线程
Lock和Condition允许程序员充分控制锁定,但大多数情况下不需要那样控制。
1.0版本开始,java中的每个对象都有一个内部锁,在方法声明时带有synchronized,那么对象的锁将会保护整个方法,调用这个方法必须获得内部对象锁
之前的plus方法是由ReentrantLock来添加锁的。
1
2
3
4
5
6
7
8
private static void plus () { reentrantLock.lock(); try { sharedVariable++; } finally { reentrantLock.unlock(); } }
当我们使用synchronized关键字时,上述方法近似于:
1
2
3
private synchronized void plus () { sharedVariable++; }
但注意,对于使用synchronized关键字修饰的方法,这个锁的锁对象是这个方法所在的类的Class对象,而非一个实例
内部对象锁只有一个关联条件。wait方法将一个线程增加到等待集中,notifyAll/notify解除等待线程的阻塞。
1
2
3
4
5
6
7
8
9
10
11
12
13
14
15
16
17
18
19
20
21
22
23
24
25
26
27
28
29
public class notify 和wait { private static final Object lock = new Object (); private static boolean flag = false ; public static void main (String[] args) { Thread thread1 = new Thread (() -> { synchronized (lock) { while ( !flag ) { try { lock.wait(); } catch (InterruptedException e) { e.printStackTrace(); } } System.out.println("Thread1 is running" ); } }); Thread thread2 = new Thread (() -> { synchronized (lock) { flag = true ; lock.notify(); System.out.println("Thread2 is running" ); } }); thread1.start(); thread2.start(); } }
wait相当于条件对象的await方法,notifyAll相当于条件对象的signAll方法
那么我们可以改造之前的代码使其更为简洁
1
2
3
4
5
6
7
8
9
10
11
12
13
14
15
16
17
18
19
20
21
22
23
24
25
26
27
28
29
30
31
32
33
public class 锁对象 { private static int sharedVariable = 0 ; private static ReentrantLock reentrantLock = new ReentrantLock (); public static void main (String[] args) { Thread thread1 = new Thread (() -> { for ( int i = 0 ; i < 1000000 ; i++ ) { plus(); } }); Thread thread2 = new Thread (() -> { for ( int i = 0 ; i < 1000000 ; i++ ) { plus(); } }); thread1.start(); thread2.start(); try { thread1.join(); thread2.join(); } catch (InterruptedException e) { e.printStackTrace(); } System.out.println("Final value of shared variable: " + sharedVariable); } private static synchronized void plus () { sharedVariable++; } }
内部锁和条件存在一些限制。包括:
不能中断一个正在获取锁的线程
不能指定尝试获取锁的超时时间
每个锁只有一个条件,这很低效。
在平时的开发中,对于锁的选择有以下几点
最好不使用以上介绍的两种锁,而是使用java.util.concurrent包中的一些机制,它会处理所有的锁定。
如果synchronized关键字适合你的程序,请使用这种方法
需要Lock/Condition结构提供的额外能力,此时使用它们
进入一个同步块也可以获得这个锁,形式如下:
1
2
3
4
5
public static void plus () { synchronized (lock){ sharedVariable++; } }
如果要使用同步块一定要了解你的锁对象。
对于
1
2
3
private synchronized void plus () { sharedVariable++; }
来说,同步块写法如下
1
2
3
4
5
public static void plus () { synchronized (同步块.class){ sharedVariable++; } }
考虑如下两个方法
1
2
3
4
5
6
7
8
private boolean done;public synchronized boolean isDone () { return done; } public synchronized void setDone (boolean done) { this .done = done; }
done的值由一个线程设置,而由另一个线程查询。
但如果另一个线程已对该对象加锁,那么这两个方法可能会堵塞
这种情况下使用volatile就很合适,可以确保当其中一个线程对done变量修改后,这个修改对读取这个变量的所有线程都可见。
1
2
3
4
5
6
7
8
private volatile boolean done;public synchronized boolean isDone () { return done; } public synchronized void setDone (boolean done) { this .done = done; }
原子性:提供了互斥访问,同一时刻只能有一个线程来对它进行操作。
可见性:一个线程对主内存的修改可以及时的被其他线程观察到。
有序性:一个线程观察其他线程中的指令执行顺序,由于指令重排序的存在,该观察结果一般杂乱无序。
synchronized保证三大性,原子性,有序性,可见性,volatile保证有序性,可见性,不能保证原子性
volatile到底做了什么:
禁止了指令重排
保证了不同线程对这个变量进行操作时的可见性,即一个线程修改了某个变量值,这个新值对其他线程是立即可见的
不保证原子性(线程不安全)
synchronized关键字和volatile关键字比较:
volatile关键字是线程同步的轻量级实现,所以volatile性能肯定比synchronized关键字要好。但是volatile关键字只能用于变量而synchronized关键字可以修饰方法以及代码块。synchronized关键字在JavaSE1.6之后进行了主要包括为了减少获得锁和释放锁带来的性能消耗而引入的偏向锁和轻量级锁以及其它各种优化之后执行效率有了显著提升,实际开发中使用 synchronized 关键字的场景还是更多一些。
多线程访问volatile关键字不会发生阻塞,而synchronized关键字可能会发生阻塞
volatile关键字能保证数据的可见性,但不能保证数据的原子性。synchronized关键字两者都能保证。
volatile关键字主要用于解决变量在多个线程之间的可见性,而synchronized关键字解决的是多个线程之间访问资源的同步性。
在Java中,final关键字用于声明一个变量的值在初始化后就不能再被修改。这对于多线程环境有一些重要的影响:
不可变性:final变量的不可变性使得它在多线程环境中是安全的,因为一旦final变量被初始化,任何线程都不能改变它的值。这消除了需要同步访问变量的需求,因为所有线程都会看到相同的值。
内存可见性:在Java内存模型中,final字段的写入和读取有特殊的规则。当对象构造完成后,final字段的值对所有线程都是可见的,即使没有使用同步。这是因为final字段的写入操作会在构造函数的结束处插入一个内存屏障,强制将final字段的值刷新到主内存,并阻止指令重排序
禁止指令重排序:编译器会确保在构造函数内对final字段的赋值操作,不会被编译器优化而进行指令重排序。这意味着,final字段在构造函数完成后,其值就不会改变。
需要注意的是,虽然final字段本身是不可变的,但如果final字段是一个引用类型,那么这个引用指向的对象可能是可变的。例如,一个final的数组或集合,数组或集合本身的内容是可以改变的。如果需要确保线程安全,还需要额外的同步措施。
总的来说,final关键字在多线程环境中提供了一种简单而有效的方式来创建不可变的数据,这对于构建线程安全的程序是非常有用的。
java.util.concurrent.atomic包提供很高校的机器指令来保证其他操作的原子性(没有使用锁)。
例如incrementAndGet方法,可以保证以原子方式对一个正数完成自增操作,用它修改plus方法的代码如下所示。
1
2
3
4
5
6
7
8
9
10
11
12
13
14
15
16
17
18
19
20
21
22
23
24
25
26
public static void main (String[] args) { Integer value = 0 ; AtomicInteger atomicInteger = new AtomicInteger (value); var t2 = new Thread (() -> { for (int i = 0 ; i < 100000 ; i++) { atomicInteger.incrementAndGet(); } }); var t1 = new Thread (() -> { for (int i = 0 ; i < 100000 ; i++) { atomicInteger.incrementAndGet(); } }); t1.start(); t2.start(); try { t1.join(); t2.join(); } catch (InterruptedException e) { e.printStackTrace(); } finally { System.out.println(value); } }
最终结果是200000
如果预期可能存在大量竞争,只需要使用LongAdder而不是AtomicLong。
当工作完成后才需要总和的值的情况下,这种方式更高效
1
2
3
4
5
6
7
8
9
10
11
12
13
14
15
16
17
18
19
20
21
22
23
24
25
26
27
28
private static LongAdder adder = new LongAdder ();public static void main (String[] args) { LocalDateTime now = LocalDateTime.now(); var t2 = new Thread (() -> { for (int i = 0 ; i < 100000000 ; i++) { adder.incrementAndGet(); } }); var t1 = new Thread (() -> { for (int i = 0 ; i < 100000000 ; i++) { adder.incrementAndGet(); } }); t1.start(); t2.start(); try { t1.join(); t2.join(); } catch (InterruptedException e) { e.printStackTrace(); } finally { LocalDateTime end = LocalDateTime.now(); System.out.println("耗时:" + ChronoUnit.MILLIS.between(now, end) + "毫秒" ); System.out.println(adder.get()); } }
这种情况下完成这么多次数的累加需要310毫秒,而AtomicInteger则需要2000毫秒左右来完成这些任务
因为大量线程会访问相同的原子值,性能会大幅下降。
LongAccumlator将这种思想推广到任意的累加操作。
效率和LongAdder相近
1
2
3
4
5
6
7
8
9
10
11
12
13
14
15
16
private static LongAccumulator adder = new LongAccumulator (Long::sum, 0 );...... public static void main (String[] args) { LocalDateTime now = LocalDateTime.now(); var t2 = new Thread (() -> { for (int i = 0 ; i < 100000000 ; i++) { adder.accumulate(1 ); } }); var t1 = new Thread (() -> { for (int i = 0 ; i < 100000000 ; i++) { adder.accumulate(1 ); } }); ......
1
2
3
4
5
6
7
8
9
10
11
12
13
14
15
16
17
18
19
20
21
22
23
24
25
26
27
28
29
public static void main (String[] args) { Thread thread1 = new Thread (() -> { try { lock.lock(); System.out.println("Thread 1: locked" ); Thread.sleep(1000 ); lock.lock(); System.out.println("Thread 1: locked again" ); } catch (InterruptedException e) { e.printStackTrace(); } finally { lock.unlock(); } }); Thread thread2 = new Thread (() -> { try { Thread.sleep(500 ); lock.lock(); System.out.println("Thread 2: locked" ); } catch (InterruptedException e) { e.printStackTrace(); } finally { lock.unlock(); } }); thread1.start(); thread2.start(); }
使用了一个可重入锁(ReentrantLock)。可重入锁允许同一个线程多次获取同一个锁,这就是为什么线程1可以两次调用lock.lock()而不会阻塞的原因。
然而,问题出在线程2上。线程2在线程1还没有完全释放锁的情况下尝试获取锁,但是线程1在释放锁之前需要等待1秒。这就导致了线程2无法获取到锁,因为它在尝试获取锁的时候,锁还被线程1持有。
这就是死锁的情况:线程1等待线程2(或其他线程)释放锁,而线程2等待线程1释放锁,导致两个线程都在等待对方,无法继续执行。
在Java中并没有解决死锁的方法,所以必须谨慎地设计程序
线程间共享变量可能是不安全的,有时要避免共享变量,使用ThreadLocal辅助类为各个线程提供各自的实例
考虑一个静态变量static dateFormat = SimpleDateFormat("yyyy-MM-DD")
当两个线程都执行String date = dateFormat.format(new Date())
就会导致混乱的结果。当然可以使用同步,但是这样的性能开销很大,或者在需要时构建一个SimpleDateFormat("yyyy-MM-DD")对象,这样同样很浪费
为每个线程构建一个实例,可以考虑以下写法
1 public static final ThreadLocal<Integer> threadLocal = ThreadLocal.withInitial(() -> 0 );
在一个给定线程首次调用get时,会调用lambda表达式构建一个属于当前线程的实例
1
2
3
4
5
6
7
8
9
10
11
12
13
14
15
16
17
18
19
20
public class 线程局部变量 { public static final ThreadLocal<Integer> threadLocal = ThreadLocal.withInitial(() -> 0 ); public static void main (String[] args) { Thread t1 = new Thread (() -> { threadLocal.set(233 ); System.out.println(Thread.currentThread().getName() + "的threadLocal值为:" + threadLocal.get()); }); Thread t2 = new Thread (() -> { threadLocal.set(666 ); System.out.println(Thread.currentThread().getName() + "的threadLocal值为:" + threadLocal.get()); }); t1.start(); t2.start(); } }
打印结果为
1 2 Thread-1 的threadLocal值为:666 Thread-0 的threadLocal值为:233
一些线程安全的类,比如Random类
如果多个线程等待一个共享的随机数生成器,这会很低效。
可以调用如下方法
1 int random = ThreadLocalRandom.current().nextInt(upperBound);
当我们在多个线程中修改数组或是列表时,很容易破坏这种数据结果,我们可以使用锁保护共享的数据结构,但是更通常的做法是选择线程安全的实现。
生产者队列向队列插入元素,消费者线程获取元素
使用阻塞队列可以使线程间安全地传递数据。
考虑银行转账时,将转账指令对象插入队列,而不是直接访问银行对象。
另一个线程从队列中取出指令并完成转账。只有这个线程可以访问银行对象的内部,因此不需要同步。
当向阻塞队列添加元素或者从队列移除元素但队列为空时,阻塞队列将导致线程阻塞。
阻塞队列会周期性地将中间结果存储。其他工作线程移除中间结果。
它还会自动平衡负载。如果第一组线程运行慢,第二组会在等待时阻塞。
阻塞队列的主要方法可以分为以下四类:
抛出异常类:当阻塞队列满时,再往队列里插入元素会抛出IllegalStateException异常;当阻塞队列空时,从队列里获取元素会抛出NoSuchElementException异常。
add(e)
返回特殊值类:插入方法会返回是否成功,成功则返回true,失败(队列已满)则返回false;移除方法,成功返回出队列的元素,队列里没有就返回null。
offer(e)
一直阻塞类:当阻塞队列满时,生产者线程继续往队列里put元素,队列会一直阻塞生产者线程,直到put数据or响应中断退出;当阻塞队列空时,消费者线程试图从队列里take元素,队列会一直阻塞消费者线程,直到队列可用。
put(e)
超时退出类:当阻塞队列满时,队列会阻塞生产者线程一定的时间,超过限时后生产者线程会退出;当阻塞队列空时,消费者线程试图从队列里获取元素,队列会阻塞消费者线程一定的时间,超过限时后消费者线程会退出。
offer(e, time, unit)
1
2
3
4
5
6
7
8
9
10
11
12
13
14
15
16
17
18
19
20
21
22
23
24
25
26
27
28
29
30
31
32
public class 阻塞队列 { public static ArrayBlockingQueue<Integer> queue = new ArrayBlockingQueue <>(3 ); public static Random r = new Random (); public static void main (String[] args) { Thread t1 = new Thread (() -> { for ( int i = 0 ; i < 10 ; i++ ) { boolean offer = queue.offer(i); if (offer) { System.out.println("生产者生产了:" + i); }else { System.out.println("队列已满" ); System.out.println("生产者等待" ); } } }); Thread t2 = new Thread (() -> { for ( int i = 0 ; i < 10 ; i++ ) { var poll = queue.poll(); if (poll == null ) { System.out.println("队列为空" ); System.out.println("消费者等待" ); } else { System.out.println("消费者消费了:" + poll); } } }); t1.start(); t2.start(); } }
运行结束后打印结果如下:
1 2 3 4 5 6 7 8 9 10 11 12 13 14 15 16 17 18 19 20 21 22 23 24 25 26 27 28 29 30 31 32 33 34 35 消费者消费了:0 队列为空 消费者等待 队列为空 消费者等待 队列为空 消费者等待 队列为空 消费者等待 队列为空 消费者等待 队列为空 消费者等待 队列为空 消费者等待 队列为空 消费者等待 队列为空 消费者等待 生产者生产了:0 生产者生产了:1 生产者生产了:2 生产者生产了:3 队列已满 生产者等待 队列已满 生产者等待 队列已满 生产者等待 队列已满 生产者等待 队列已满 生产者等待 队列已满 生产者等待
可以看到消费者先消费了十次,然后生产者又生产了十次,当队列满的时候offer返回了false,所以无法继续生产,而消费者端试图获取队列内容时发现队列为空,poll直接返回了false,其后续也无法进行消费。
在java.util.concurrent包中提供了映射,集合和队列的高效实现
它们运行并发访问数据结构不同部分并尽可能地减少竞争
Java API提供了一些新方法可以更方便地完成原子更新。
调用compute方法并提供一个计算新值的函数
1 map.compute(word,(k,v) -> v == null ? 1 : v+1 )
它们使用方法类似merge方法
同样的compute方法也有computeIfAbesent和computeIfPresent方法在不同的情况下计算新值。
JAVA API为并发散列提供了批操作,其实有其他线程在处理映射,这些操作也能安全执行,批操作会遍历或处理映射中的元素。
不过这不会冻结映射的状态,除非你知道映射不会在中途被修改,否则应当把结果看作映射状态的近似。
有三种不同的操作
search 为每个键或值应用一个函数,直到函数生成一个非null的结果,返回这个结果
reduce 组合所有键和值
forEach 为所有键或值应用一个函数
我们可以对比一下HashMap和并发映射的速度
1
2
3
4
5
6
7
8
9
10
11
12
13
14
15
16
public static void main (String[] args) { var map = new HashMap <Integer, Integer>(); for ( int i = 0 ; i < 15 ; i++ ) { map.put(i, i); } LocalDateTime begin = LocalDateTime.now(); map.forEach( (k, v) -> { try { Thread.sleep(500 ); } catch (InterruptedException e) { throw new RuntimeException (e); } }); LocalDateTime end = LocalDateTime.now(); System.out.println("耗时:" + ChronoUnit.MILLIS.between(begin,end) + "毫秒" ); }
这段代码更新所有的元素,让其的值+1
总耗时在7599毫秒左右
换成并发映射来重新测试一下
1
2
3
4
5
6
7
8
9
10
11
12
13
14
15
16
public static void main (String[] args) { var map = new ConcurrentHashMap <Integer, Integer>(); for ( int i = 0 ; i < 15 ; i++ ) { map.put(i, i); } LocalDateTime begin = LocalDateTime.now(); map.forEach(1 , (k, v) -> { try { Thread.sleep(500 ); } catch (InterruptedException e) { throw new RuntimeException (e); } }); LocalDateTime end = LocalDateTime.now(); System.out.println("耗时:" + ChronoUnit.MILLIS.between(begin,end) + "毫秒" ); }
此时运行时间只有1022毫秒,快了7倍
如果想要一个很大的线程安全的集而不是映射,请使用Set<String> set = newKeySet();
CopyOnWriteArrayList是Java并发包java.util.concurrent中提供的一个线程安全的ArrayList。它的主要特性是每次对列表进行修改操作(如add,set等)时,都会创建底层数组的一个新副本。这种方式通常代价较高,但在遍历操作远多于修改操作时,可能比其他方法更高效。当你无法或不想同步遍历操作,但需要防止并发线程之间的干扰时,CopyOnWriteArrayList非常有用。
对于Set,也有与之对应的CopyOnWriteArraySet
对于数组,Arrays类提供了大量并行化操作。
我们首先让一个拥有一千万个数字的列表进行排序
1
2
3
4
5
6
7
8
9
10
11
public static void main (String[] args) { Random r = new Random (); var arr = new Long [10000000 ]; for ( int i = 0 ; i < 10000000 ; i++ ) { arr[i] = r.nextLong(); } LocalDateTime begin = LocalDateTime.now(); Arrays.sort(arr); LocalDateTime end = LocalDateTime.now(); System.out.println("耗时:" + ChronoUnit.MILLIS.between(begin,end) + "毫秒" ); }
最终耗时5011毫秒
当我们使用并行操作来排序的时候
1
2
3
4
5
6
7
8
9
10
11
public static void main (String[] args) { Random r = new Random (); var arr = new Long [10000000 ]; for ( int i = 0 ; i < 10000000 ; i++ ) { arr[i] = r.nextLong(); } LocalDateTime begin = LocalDateTime.now(); Arrays.parallelSort(arr); LocalDateTime end = LocalDateTime.now(); System.out.println("耗时:" + ChronoUnit.MILLIS.between(begin,end) + "毫秒" ); }
最终耗时仅1436毫秒,快了三倍。
在[fork-join框架](# 12.6.4 fork-join框架)中有近似的方法实现并行排序
构建一个新的线程开销有些大。
如果程序中创建了大量生命周期很短的线程,那么不该把任务映射到一个单独的线程,而应该使用线程池。
线程池中包含许多准备运行的线程。
为线程池提供一个Runnable,其中会有一个线程调用run方法,当run方法退出时,这个线程不会死亡,而是留在池中准备为下一个请求提供服务。
Runnable封装了一个异步运行的任务。
Callable与Runnable类似,但是有返回值
1
2
3
4
@FunctionalInterface public interface Callable <V> { V call () throws Exception; }
例如Callable<Integer>表示一个最终返回Integer对象的异步计算。
Future则是保存异步计算的结果。
可以启动一个计算,将Future对象交给某个方法。
Future接口在Java中被广泛用于表示异步计算的结果。以下是Future接口的一些常用方法:
boolean cancel(boolean mayInterruptIfRunning): 尝试取消执行此任务。如果任务已完成,已取消或由于某些其他原因无法取消,则此尝试将失败。当调用cancel方法后,再调用isDone方法,无论任务是否完成,都将返回true。boolean isCancelled(): 如果在任务正常完成前被取消,则返回 true。boolean isDone(): 如果任务完成,则返回true。完成可能是由于正常终止,异常或取消,在所有这些情况下,此方法都将返回true。V get() throws InterruptedException, ExecutionException: 等待计算完成,然后获取其结果。V get(long timeout, TimeUnit unit) throws InterruptedException, ExecutionException, TimeoutException: 如果在指定的时间内计算完成,则获取其结果,否则抛出TimeoutException。
另一个使用的方法是使用FutureTask,它实现了Future和Runnable接口
以下是一个使用的例子
1
2
3
4
5
6
7
8
9
10
11
12
13
public static void main (String[] args) throws ExecutionException, InterruptedException { Callable<Integer> callable = () -> { Thread.sleep(1000 ); return 1 ; }; var future = new FutureTask <>(callable); var t = new Thread (future); t.start(); System.out.println("任务已经开始咯" ); var result = future.get(); System.out.println("result = " + result); System.out.println("任务已经结束咯" ); }
在这个例子中,我们创建了一个Callable对象以及FutureTask
我们让其睡眠一秒后再返回结果,最后输出结果也等待了一秒才输出最后结果。
执行器(Executors)类有许多用来构造线程池的静态工厂方法
Executors.newCachedThreadPool(): 创建一个可根据需要创建新线程的线程池,但在可用时将重用以前构造的线程。这些线程池通常用于执行大量的短期异步任务。Executors.newFixedThreadPool(int nThreads): 创建一个可重用固定线程数的线程池。这种类型的线程池适用于执行长期的任务。Executors.newSingleThreadExecutor(): 创建一个只有一个线程的线程池,它只会使用唯一的工作线程来执行任务,保证所有任务按照指定顺序(FIFO, LIFO, 优先级)执行。Executors.newScheduledThreadPool(int corePoolSize): 创建一个可以定时或周期性执行任务的线程池。
可以用以下方法之一ExecutorService提交一个Runnable或Callable对象
submit方法有三种形式:
Future<T> submit(Callable<T> task): 提交一个返回值的任务用于执行,然后返回一个表示任务的未决结果的 Future。该 Future 的 get 方法在成功完成时将会返回该任务的结果。Future<?> submit(Runnable task): 提交一个 Runnable 任务用于执行,并返回一个表示该任务的 Future。该 Future 的 get 方法在成功完成时将会返回 null。Future<T> submit(Runnable task, T result): 提交一个 Runnable 任务及一个结果对象用于执行,然后返回一个表示任务的未决结果的 Future。该 Future 的 get 方法在成功完成时将会返回给定的结果对象。
线程池使用完成之后,调用shutdown。这个方法启动线程池的关闭序列。被关闭的执行器不再执行新的任务。所有任务完成时,线程池中的线程死亡。
另一种方法是调用shutdownNow,这会终止所有尚未开始的任务。
总结使用连接池时所做的工作:
调用Executors类的静态方法建立线程池
调用sumbit提交Runnable或Callable对象
保留返回的Future对象,以便得到结果或者取消任务
不想再提交任何任务时,调用shutdown
以下是一个线程池使用的例子
1
2
3
4
5
6
7
8
9
10
11
12
13
14
15
16
17
18
19
20
21
22
23
24
25
26
27
public static void main (String[] args) throws InterruptedException { ExecutorService executor = Executors.newFixedThreadPool(8 ); List<Future<Integer>> futures = new ArrayList <>(); LocalDateTime begin = LocalDateTime.now(); for (int i=0 ;i<32 ;i++){ Callable<Integer> callable = () -> { Thread.sleep(1000 ); return 1 ; }; Future<Integer> future = executor.submit(callable); futures.add(future); } for (Future<Integer> future : futures) { while (!future.isDone()) { Thread.sleep(100 ); } System.out.println("任务完成" ); } LocalDateTime end = LocalDateTime.now(); System.out.println("耗时:" + ChronoUnit.MILLIS.between(begin,end) + "毫秒" ); executor.shutdown(); }
这段代码中我们首先建立一个八个线程的线程池,然后提交了32个内容是睡眠一秒并返回1的Callable对象
同时我们还把所有的Future对象保存在列表中,每隔100毫秒检查一次是否完成任务。
最后显示整体耗时4092毫秒,与32/8的结果相近。
还有ScheduledExecutorService接口为调度执行或重复执行的任务提供了一些方法。
Executors类的newScheduledThreadPool和newSingleThreadScheduledExecutor方法会返回实现了ScheduledExecutorService接口的方法。
可以调度Runnable再初始延迟后再执行一次,也可以调度Runnable定期运行一次。
有时使用执行器有更策略性的原因:需要控制一组相关的任务。例如:shutdownNow方法取消所有未开始的任务。
invokeAny方法提交一个Callable对象集合中的所有对象,并返回其中一个人物的结果,通常是执行最快的那个任务。
下面是一个例子来展示效果。
1
2
3
4
5
6
7
8
9
10
11
12
13
14
15
16
17
public static void main (String[] args) throws ExecutionException, InterruptedException { Random r = new Random (); ExecutorService executor = Executors.newFixedThreadPool(8 ); List<Callable<Long>> list = new ArrayList <>(); for ( int i = 0 ; i < 8 ; i++ ) { var l = r.nextLong(1000 ,2000 ); System.out.println("任务" + i + "耗时:" + l + "毫秒" ); Callable<Long> callable = () -> { Thread.sleep(l); return l; }; list.add(callable); } Long l = executor.invokeAny(list); executor.shutdownNow(); System.out.println("最快的任务耗时:" + l + "毫秒" ); }
在这段代码中,我们生成了8个睡眠时间不同的任务,并利用invokeAny方法提交了一个Callable集合
当得到结果后调用shutdownNow关闭线程池。
我们便可以得到其中运行速度最快的那个
输出结果如下
1 2 3 4 5 6 7 8 9 任务0 耗时:1352 毫秒 任务1 耗时:1820 毫秒 任务2 耗时:1596 毫秒 任务3 耗时:1965 毫秒 任务4 耗时:1919 毫秒 任务5 耗时:1536 毫秒 任务6 耗时:1851 毫秒 任务7 耗时:1830 毫秒 最快的任务耗时:1352 毫秒
还有invokeAll提交一个Callable对象列表,并返回一个Future对象列表作为任务答案集合。
我们可以用这个方法修改上边的线程池例子
1
2
3
4
5
6
7
8
9
10
11
12
13
14
15
16
17
public static void main (String[] args) throws InterruptedException { ExecutorService executor = Executors.newFixedThreadPool(8 ); List<Callable<Integer>> list = new ArrayList <>(); LocalDateTime begin = LocalDateTime.now(); for (int i=0 ;i<32 ;i++){ Callable<Integer> callable = () -> { Thread.sleep(1000 ); return 1 ; }; list.add(callable); } List<Future<Integer>> futures = executor.invokeAll(list); LocalDateTime end = LocalDateTime.now(); System.out.println("耗时:" + ChronoUnit.MILLIS.between(begin,end) + "毫秒" ); executor.shutdown(); }
最后结果是4040毫秒,与原方法耗时类似。
如果想根据计算出结果的顺序 得到这些结果,可以使用ExecutorCompletionService
该服务会管理Future对象的一个阻塞队列,一旦结果可用就会加入队列。
以下例子是ExecutorCompletionService的一个例子
1
2
3
4
5
6
7
8
9
10
11
12
13
14
15
16
17
18
19
20
21
public static void ExecutorCompletionService队列() { var service = new ExecutorCompletionService <Long>(executor); for ( int i = 0 ; i < 8 ; i++ ) { var l = r.nextLong(1000 ,2000 ); Callable<Long> callable = () -> { Thread.sleep(l); return l; }; service.submit(callable); } for ( int i = 0 ; i < 8 ; i++ ) { try { Future<Long> future = service.take(); System.out.println("任务" + i + "耗时:" + future.get() + "毫秒" ); } catch (InterruptedException | ExecutionException e) { e.printStackTrace(); } finally { executor.shutdown(); } } }
这段代码可以按顺序显示出每个任务的耗时,可以让我们知道哪个线程是最优的。
有些应用使用了大量线程,但是大多数都是空闲的。
另外一些应用可能对每个处理器内核分别使用一个线程,来完成计算密集型任务,例如图像或视频处理。
我们展示一个简单的例子。假设我们想统计一个数组中符合要求的数字,我们可以将其一分为二,最后将其结果合并。
要采用框架可用的形式完成这种递归计算,需要提供一个扩展RecursiveTask<T>类(会生成一个类型为T的结果)或提供一个扩展RecursiveAction类。再覆盖compute来生成并调用子任务然后合并结果。
1
2
3
4
5
6
7
8
9
10
11
12
13
14
15
16
17
18
19
20
21
22
23
24
25
26
27
28
29
30
31
32
33
34
35
36
37
38
39
40
41
42
43
44
45
46
47
48
49
50
51
52
53
54
55
56
57
public class forkjoin 框架 { private static final int Size = 100000000 ; private static final Random r = new Random (); public static void main (String[] args) { var arr = new int [Size]; for ( int i = 0 ; i < Size; i++ ) { arr[i] = r.nextInt(Size); } int limit = r.nextInt(Size); System.out.println("需要大于的值:" + limit); Counter counter = new Counter (arr,0 ,arr.length,i -> i > limit); var pool = new ForkJoinPool (); LocalDateTime begin = LocalDateTime.now(); pool.invoke(counter); LocalDateTime end = LocalDateTime.now(); System.out.println("耗时:" + ChronoUnit.MILLIS.between(begin,end) + "毫秒" ); System.out.println("大于" + limit + "的值有:" + counter.join() + "个" ); } } class Counter extends RecursiveTask <Integer> { private static final int THRESHOLD = 1000 ; private final int [] values; private final int from; private final int to; private DoublePredicate filter; public Counter (int [] values, int from, int to, DoublePredicate filter) { this .values = values; this .from = from; this .to = to; this .filter = filter; } @Override protected Integer compute () { if ( to - from < THRESHOLD ) { int count = 0 ; for ( int i = from; i < to; i++ ) { if ( filter.test(values[i]) ) { count++; } } return count; } else { int mid = (from + to) / 2 ; var first = new Counter (values,from,mid,filter); var second = new Counter (values,mid,to,filter); invokeAll(first,second); return first.join() + second.join(); } } }
在重写的compute方法中,invokeAll方法接收到很多任务并阻塞,直到任务全部完成。
join方法将生成结果。对每个子任务应用join并返回其总和。
RecursiveAction的应用也是类似,以下是一个多线程快排的例子
1
2
3
4
5
6
7
8
9
10
11
12
13
14
15
16
17
18
19
20
21
22
23
24
25
26
27
28
29
30
31
32
33
34
35
36
37
38
39
40
41
42
43
44
45
46
47
48
49
50
51
52
53
54
55
56
57
58
59
60
public class forkjoin 和快排 { private static final int Size = 100000000 ; private static final Random r = new Random (); public static void main (String[] args) { var arr = new int [Size]; for ( int i = 0 ; i < Size; i++ ) { arr[i] = r.nextInt(Size); } QuickSort quickSort = new QuickSort (arr, 0 , arr.length - 1 ); var pool = new ForkJoinPool (); LocalDateTime begin = LocalDateTime.now(); pool.invoke(quickSort); LocalDateTime end = LocalDateTime.now(); System.out.println("耗时:" + ChronoUnit.MILLIS.between(begin, end) + "毫秒" ); } } class QuickSort extends RecursiveAction { private final int [] arr; private final int left; private final int right; private void swap (int i, int j) { int temp = arr[i]; arr[i] = arr[j]; arr[j] = temp; } public QuickSort (int [] arr, int left, int right) { this .arr = arr; this .left = left; this .right = right; } @Override protected void compute () { if ( left >= right ) { return ; } int x = arr[left + right >> 1 ]; int i = left - 1 ; int j = right + 1 ; while (i<j){ do i++; while (arr[i]<x); do j--; while (arr[j]>x); if (i<j){ swap(i,j); } } QuickSort leftTask = new QuickSort (arr, left, j); QuickSort rightTask = new QuickSort (arr, j + 1 , right); invokeAll(leftTask, rightTask); } }
最后的耗时是1800毫秒,与之前的[并行数组算法](#12.5.7 并行数组算法)中的排序方法耗时接近。
在后台中forkjoin框架使用了一种有效的启发式方法来平衡可用线程的工作负载,这种方式称之为工作密取(work stealing)
每个工作线程都有任务的一个双端队列,一个工作线程将子任务压入双端队列队头。(只有一个线程可以访问队头,所以不加锁)
当一个工作线程空闲时,它会从队列尾部密取一个任务,由于大的任务都在队尾,所以这种情况很少见。
之前的并发方式计算都是分解一个任务,然后等待直到任务完成。不过这不总是个好主意。
接下来会介绍无需等待的异步计算。
Future对象的get方法会堵塞,直到值可用。
CompletableFuture类实现了Future接口,它提供了获得结果的另一种机制。
需要注册一个回调函数,一旦结果可用,就会利用该结果调用这个回调。
形式如下
1
2
CompletableFuture<Integer> future = ...; future.thenAccept(s->...);
一旦结果可用就可以对结果进行处理而无须阻塞。
有些API方法会返回CompletableFuture对象,比如HttpClient获取一个网页
要想异步运行任务并得到Completable,不要直接交给执行器,而应当调用CompletableFuture.supplyAsync。
1
2
3
public static CompletableFuture<String> getFuture () { return CompletableFuture.supplyAsync(() -> "Hello" , executorService); }
然后使用它的thenAccept方法即可。
CompletableFuture可能以两种方式完成,得到结果,或者有一个未捕获的异常。
处理这种情况,可以使用whenComplete方法,对结果和异常调用提供所提供的函数
1
2
3
4
5
6
7
8
9
public static void main (String[] args) { getFuture().whenComplete((result, throwable) -> { if (throwable != null ) { throwable.printStackTrace(); } else { System.out.println(result); } }); }
对于getFuture方法的whenComplete使用如例子一样,提供两个方法,当一场为空则打印栈信息,否则就打印结果。
CompletableFuture之所以被叫做可完成的,是因为它可以手动设置完成值。(这样的对象称为承诺Promise)
例如CompletableFuture.supplyAsync方法在完成时就会隐式设置返回值。不过它也支持显式返回。
1
2
3
4
5
6
7
8
9
10
11
12
13
14
15
16
17
18
19
20
21
22
23
24
25
26
27
28
29
public static void main (String[] args) { var future = new CompletableFuture <Integer>(); executorService.execute(() -> { try { future.complete(workSmart()); } catch (InterruptedException e) { e.printStackTrace(); } }); executorService.execute(() -> { try { future.complete(workSmart()); } catch (InterruptedException e) { e.printStackTrace(); } }); future.thenAccept(System.out::println); executorService.shutdown(); } public static int workSmart () throws InterruptedException { Thread.sleep(1000 ); return 1 ; } public static int workHard () throws InterruptedException { Thread.sleep(2000 ); return 1 ; }
这个例子中,聪明的方法在睡眠一秒后返回答案,一秒后显示了future得到的答案,而代码却又等待了一秒才结束运行。
说明它完成任务之后直接进行了打印,没有等待艰难的方法的答案。
实际中也可以使用异常完成Future
1
2
Throwable t = ...f.completeExceptionally(t)
isDone可以指出一个Future对象是否已经完成,在上述的例子中可以使用这个信息使得方法提前停止工作。
非阻塞调用通过回调来实现。程序员为任务完成后的动作注册回调。
如果下一个动作也是异步的,它的下一个动作就会在一个不同的回调中。
为了解决这种问题,CompletableFuture类提供了一种机制解决这个问题。可以将异步任务组合为一个处理流水线。
1
2
3
4
5
6
7
8
9
10
11
12
13
14
15
16
17
18
19
20
21
22
23
24
25
26
27
28
29
30
public class 组合可完成Future { private static final ExecutorService executorService = Executors.newFixedThreadPool(2 ); public static void main (String[] args) throws ExecutionException, InterruptedException { var future1 = CompletableFuture.supplyAsync(() -> { try { Thread.sleep(1000 ); } catch (InterruptedException e) { e.printStackTrace(); } System.out.println("future1完成" ); return 1 ; },executorService); var future2 = future1.thenApplyAsync(i -> { try { Thread.sleep(2000 ); } catch (InterruptedException e) { e.printStackTrace(); } System.out.println("future2完成" ); return i + 1 ; },executorService); future2.thenAccept(System.out::println); System.out.println("开始执行" ); executorService.awaitTermination(5 , TimeUnit.SECONDS); executorService.shutdown(); } }
这段代码中我们创建了两个Future对象,它们分别睡眠一秒和两秒,并返回一个数字。
我们将其放入线程池,然后用awaitTermination阻塞主线程保证其任务结束后才能继续执行。
最后输出结果如下:
1
2
3
4
开始执行 future1完成 future2完成 2
可以看到开始执行输出后才输出Future中的结果
当CompletableFuture出现异常时,有handle可以设置一个函数处理异常。
但是很多情况下可以调用exceptionally方法,当出现异常时,这个方法会计算一个虚值(dummy value)。
对于超时也有类似的处理方案,可以调用completeOnTimeout方法。